Character animation in VVVV
As my weapon of choice, the visual programming environment VVVV provides a huge amount of functionality in the area of multimedia and 3D computer graphics - all accessible in a nice non-textual programming environment. While there exist several ways of manipulation 3D geometry in VVVV, right now there are no explicit methods for doing character animation.
So, this project (which was topic of my diploma thesis) aims to create an API, which introduces the terms of character animation to the world of VVVV. In this article I’m giving a little introduction of the developed nodes, and how to use them.
Installation
The nodes have been developed using VVVV version 40beta23, and are therefore only tested with that version. First, download the nodes here: Skeleton.zip. Just place the files contained in the zip into the plugins-directory of you VVVV folder. Note, that you need Microsoft .NET Framework 2.0 and SlimDX installed, to use the nodes.
Alternatively, you can checkout the latest version of the sourcecode from the VVVV plugin repository on Sourceforge:
http://vvvv.svn.sourceforge.net/svnroot/vvvv/plugins/c#/Skeleton/SkeletonNodes/trunk
and
http://vvvv.svn.sourceforge.net/svnroot/vvvv/plugins/c#/Skeleton/SkeletonInterfaces/trunk
That should be it, let’s go, create some skeletons.
But before we start …
… let’s talk about some terms we will use from now on, quickly. For character animation in computer graphics, the most commonly used metaphor is binding skeletons to a geometry. A skeleton consists of joints, which can be animated. Animating joints ultimatly leads to animating the bound geometry accordingly.
Joints are arranged in a tree structure, beginning with the root joint (which might be somewhere around a characters belly, for example). Every joint can have child joints (e.g. fingers are children of the wrist), and most of the joints have one parent joint (e.g. the elbow’s parent is the shoulder). The position of a specific joint relative to its parent joint in “unanimated” pose is defined by the Base Transformation. The transformation, which describes the movement of a joint (e.g. raising the arm) is refered to as Animation Transformation. Both terms, “Base Transformation” and “Animation Transformation” are not commonly used in computer graphics, but only have been introduced here, to distinguish between a) describing a skeleton’s shape and b) defining a skeleton’s animation, respectivly. There may be other, more suitable terms for those two transformations.
One last thing …
In the screenshots below, a certain window is used to display skeletons and visualize how the nodes work. Don’t get confused, if you haven’t seen it yet in VVVV, because it comes from the SelectJoint node, which is described below. It just comes very handy for debugging and viewing skeletons.
Oh, i forgot: the Skeleton type
To be able to pass skeletal information from one VVVV node to another, the “type” Skeleton has been introduced. Most of the nodes described below will have such a Skeleton pin as in- or output.
I guess we can start: creating skeletons
One way of using character rigs in VVVV of course is importing them from an external 3D modelling package like Maya. This can be done easily by using the Collada Importer provided by VVVV. Another approach is creating the skeleton data inside VVVV. There are two ways of doing that: a spread-based and a graph-based way, both having advantages and disadvantages.
Using the node CreateJoint (Skeleton) is the way to go, if you wish to create skeletons based on spreads - for example if you want a dynamic skeleton, with an arbitrary number of joints (which you actually might not even know), and arbitrary topology. It takes spreads of data, one slice for each joint, and outputs a Skeleton-object based on this. This is an example of how you would use CreateJoint (Skeleton):
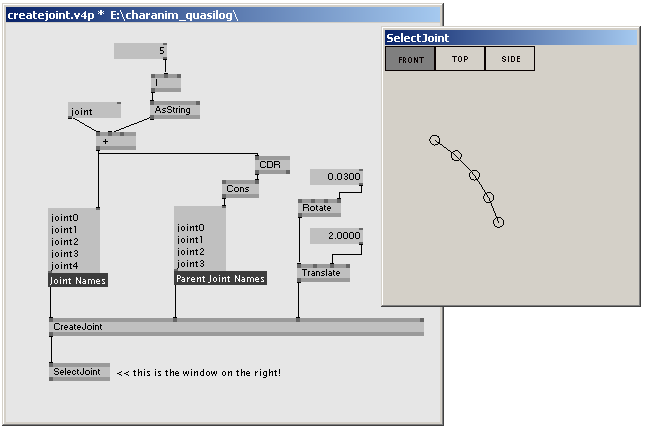
The use of CreateJoint to dynamically create a straight skeleton. Joints are defined by its joint names, which have to be unique. The topology of the skeleton is defined by every joint's parent joint. The parent of 'joint1' is 'joint0', the parent of 'joint2' is 'joint1', and so on. Every joint is translated 2 units and rotated slightly to its parent joint.
If you’d like to create some skeleton, which is more specific and static in terms of its underlying structure, e.g. a human skeleton, you might prefer the graph-based approach using the node Joint (Skeleton Join). In contrast to its spread-based brother, this node doesn’t take spreads as input, but only one value per input. In the most simple case, the output of Joint (Skeleton Join) is a Skeleton-object, which contains one single joint. Because this alone isn’t any fun at all, such a Skeleton-object can flow into another Joint (Skeleton Join)-node, which makes it the child of another joint. This way, the skeleton’s topology is defined by the vvvv graph. Take a look at this example to finally understand, what I’m trying to say:
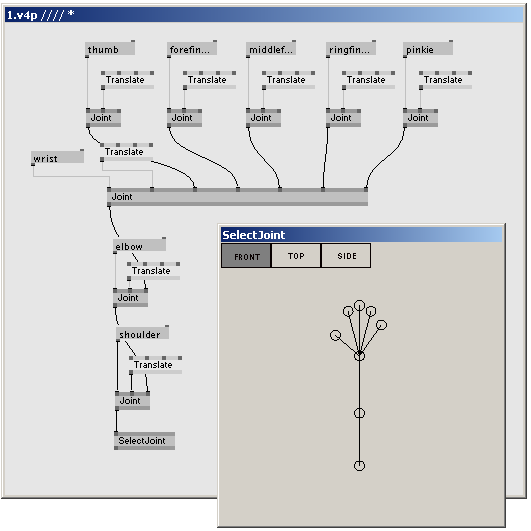
Creating a skeleton using the Joint (Skeleton Join) node. Every node creates a sub-skeleton, which again is assigned to other ones. The bottom most Joint node outputs the complete skeleton of the hand. Here, the skeleton's topology is defined by the VVVV graph topology.
Moving single joints
Alright, now that we have created our skeleton, animating it would make sense. This is simply done by passing our brandnew Skeleton-object through a SetJoint (Skeleton) node. Although typical setter-nodes in VVVV usually manipulate single slices of a spread, SetJoint (Skeleton) works in a similar way. It manipulates single joints of a skeleton, selected through a selector pin.
Using this node, you can set most of a joint’s properties - you can even change its parent joint (Which is not tested very well yet, by the way). But the most common way of using SetJoint (Skeleton) is setting the Animation Transform pin, which ultimatly leads to a movement of a specific joint.
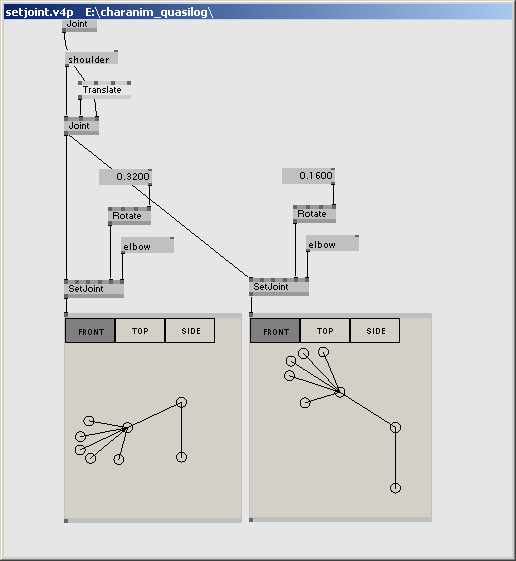
Animating joints using the SetJoint (Skeleton) node. The 'elbow' joint is selected through the selector pin. The joint is rotated by setting its animation transformation property. Note, how there come up multiple different 'poses' inside the patch.
Selecting joints
As you can see in the previous image, you need to know a joint’s name to be able to edit it with the SetJoint (Skeleton) node. This might be ok, if you get the joint name from somewhere programatically anyway. If you want to explicitly select a specific joint, e.g. your character’s shoulder, you don’t want to mess with the correct spelling, and prefer a visual way of selecting instead. This is, where the SelectJoint (Skeleton) node comes into play. It provides a window, which displays a skeleton in its current pose, and enables you to select specific joints by clicking them. SelectJoint (Skeleton) outputs the names of the selected joints. Besides selecting, this node is also very useful for debugging, and viewing animations - just as in the screenshots above.
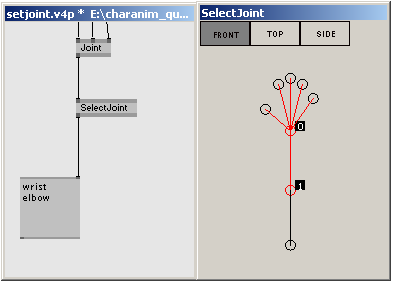
Selecting Joints using the SelectJoint (Skeleton) node. The names of the joints, which are selected by clicking them inside the editor window, are returned by the node.
Animating on a higher level
Ok, moving single joints might be enough for waving a character’s arm or make it nod. But for more complex animations, or in your overall program logic, you don’t want to deal with single joints all the time. Instead, you want to talk about “poses” and “animations”, which should be triggerd in certain situations. To be able to work in such kind of way, the nodes InputMorph (Skeleton) and MixPose (Skeleton) are very useful.
InputMorph (Skeleton) works similar to the InputMorph (Value) node. It is used to interpolate through a series of poses by modulating an input value. This is very useful to morph from one pose to another - and therefore can be used to work in a way oftenr refered to as “pose-to-pose animation”.
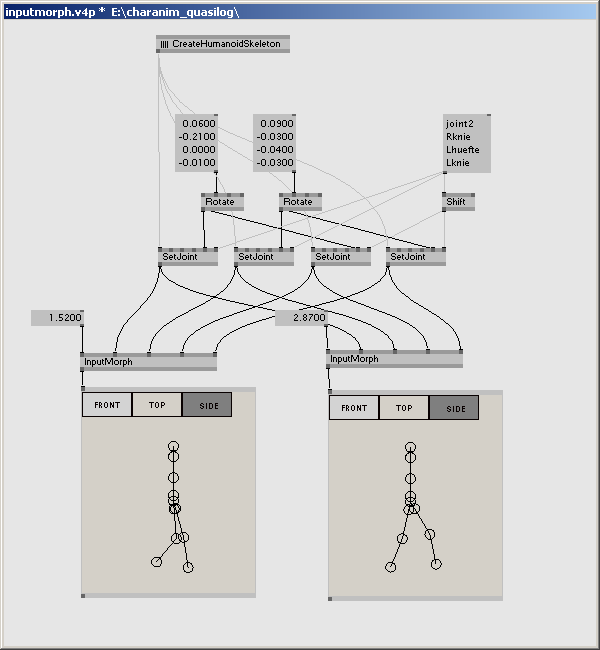
Interpolating through a series of poses. The SetJoint (Skeleton) nodes define four key poses of a simple walk cycle. The InputMorph (Skeleton) nodes create intermediate poses, based on the input value on the left most side.
MixPose (Skeleton) like InputMorph (Skeleton) interpolates multiple poses and returns a result pose. In contrast to InputMorph (Skeleton) it doesn’t have one modulating value, but one for each incoming pose. This modulating value defines, to which extend the according input pose is expressed in the final result pose.
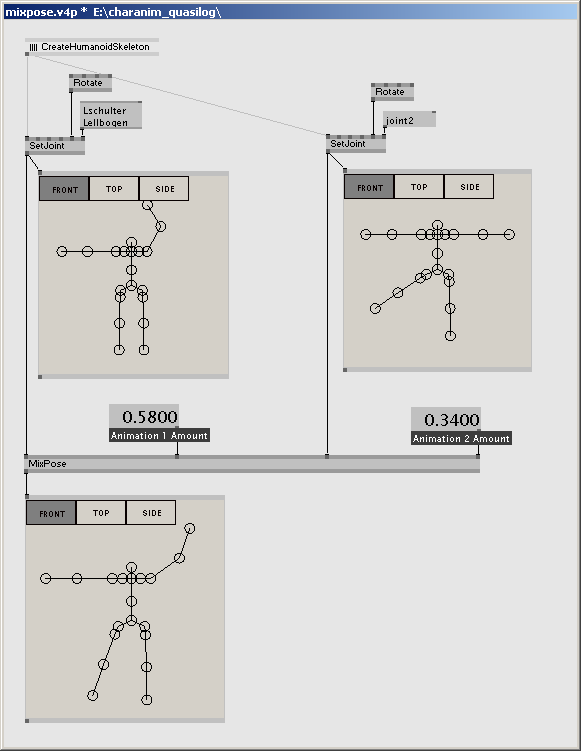
Combining two poses or animations using the MixPose (Skeleton) node. For each input pose, the amount of expression in the resulting pose can be defined.
InputMorph (Skeleton) works like a cross fader, MixPose (Skeleton) like line faders between single poses, if you want to.
Applying animations
So far we only viewed the results of our animations via SelectJoint (Skeleton)’s editor window, but didn’t output anything in any kind of renderer. First thing you will need are the global, compiled transformations of each joint. All transformations we dealt with until now were local transformations inside the joint’s space. However, to get a joint’s global transformation in world space, we need something, that “sums up” all local transformations in a joint chain. This is done by the node GetJointTransform (Skeleton). It takes an animated skeleton as an input, and outputs the compiled transformations of the joints, which are selected by the selector pin (leave the selector pin empty, to get all joints).
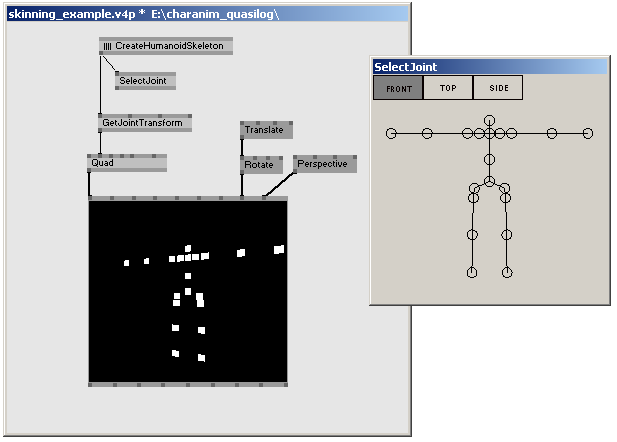
A humanoid skeleton created inside a subpatch. The joint positions in world space are computed by the GetJointTransform (Skeleton) node.
Having the global transformations, you can use them e.g. to kind of “assign” objects to joints, say, if your character consists of boxes. Also, you can use the information of the joint’s world position to accomplish some kind of collision detection, and so on. Finally, the compiled transformations are necessary for skinning, which will be explained in the next article.
Known Issues
There are still a lot of issues with the nodes described above. I set up quick bug tracker at sagishi.zive.at/bugs, where there are listed upcoming tasks to do. It’s public, so feel free to add issues, if you want to give feedback. However, some of the major issues are:
- Constraints (or joint limits): In the initial implementation there has been a way of setting constraints for each joint, to define, how far, and aroun which axes a joint can move. However, this has been in combination with saving joint rotations as euler angles. In the meantime, those euler angles have been replaced with quaternions. I haven’t stumbled upon a simple way of defining limits for quaternion rotations - any hints very much appreciated.
- Performance: There’s definitly a lot of potential in improving performance. When several
InputMorph (Skeleton)nodes are connected in serial, framerate drops. This is caused by the fact, that the whole chain of nodes has to recalculate complete skeletons, as soon es only one joint changes. There is need of a smarter way to handle this. - Inverse kinematcis would be awesome.


Buy:Petcam (Metacam) Oral Suspension.Prevacid.Zyban.100% Pure Okinawan Coral Calcium.Retin-A.Human Growth Hormone.Prednisolone.Valtrex.Mega Hoodia.Nexium.Synthroid.Lumigan.Arimidex.Zovirax.Actos.Accutane….